How to Create a WordPress Website in 2025
Hey there, I guess you are willing to start an online presence. That is a wise decision because every business dream today is to be in front of the world by creating a Website, especially a WordPress website.
Have you ever thought about owning your website, but don’t know where to begin?
If you’re just starting out or if you’ve been around the block once or two then, then you should be attentive for this one.
When it comes to creating your websites, I can help with my articles if you need advice on the steps to follow to own a website.
Having a website nowadays is already an assurance of profit and prosperity. But having a website alone is not an assurance for progression.
Because there are a lot of things that need to be done to keep the website sky rocking the Google search engines. So that you can get some cash notifications on a random basis.
For now, I will talk about the steps to create a WordPress website. Creating a website doesn’t require you to be a programmer or obviously need to hire a programmer.
You can hire a programmer to do the building of the website for you if you want, or you can do it yourself; all decisions depend on you.
In today’s world, I think programmers are needed for the creation of chatbots, automation systems, and special designs for websites, for example, changing the designs for a specific theme, SEO, and many others.
So, the steps which you are going to learn from here are just simple copy and paste methods using WordPress.
WordPress has reduced the gap between a webmaster and an ordinary individual, especially in the creation of a website with WordPress, especially with the presence of Artificial Intelligence. The WordPress website has made everything easy for anyone to be able to create a website at their own will and likeness, designs of their choice, and many more.
The online web hosting space is very crowded, and there are many fantastic hosting websites with WordPress to choose from. This Hosting review is meant as a way to shine some light on the positive aspects of these web hosting companies and help point out strengths and weaknesses.
Many features will not be shown right away, for I will be posting later as updates of the original article or as a new separate post, so stay random to my website for more clarity.
I would consider hosting with one of these companies if you expect moderate to heavy traffic and are on a budget.
In case of any questions, please leave a comment below. I will be grateful to have questions to answer. I strongly believe we understand deeply when questions and answers are available.
Step 1: Register your domain name.
Registering a domain nowadays is not as difficult as 15 years ago. Today, registering a website is cheaper and easier than ever. And as time passes, the tasks become easier and effortless.
Before starting, I would like to ask you to take a look at web hosting. Visit here to learn about web hosting before we continue. Web hosting is a very important part to understand when it comes to building your website, especially with how to host your website.
As a result of these possibilities, everybody wants to own a website.
This is causing website maintenance to become difficult, that is, ranking on the Google search engines is becoming more and more difficult due to the increasing number of competitors. But, on the other hand, this is a life-changing move.
Today, there are many Domain hosting websites with WordPress through which we can legalise our website domains. They are called Web Hosting. We will learn about free hosting and paid web hosting websites with WordPress.
We will start with the paid web hosting websites. They are the best, and I recommend paid web hosting websites with WordPress to everybody trying to bring his or her business to the world.
Paid companies offer data security to websites, security against hackers, and many more advantages. One big important thing to know is if your website is secure, then your audience is secure, hence there is Trust.
In this article, I will provide a brief on the various web hosting websites with WordPress. Then, I will write full content about each web hosting website later. Only the web hosting in colour is clickable. These web hosts are all good, and it is hard to distinguish which one is better than the other. Every user has different specifications on what they want from each web hosting, and thus, this differentiates the choice of each user. Some of the paid hosting companies are listed below;
- Bluehost:
Bluehost is one of the best web hosting websites with WordPress and one of the most popular web hosting companies on the internet. With just one click of the WordPress install, designing a website becomes very easy for anyone.
To view more on Bluehost, visit the articles here…
- HostGator:
HostGator is a web hosting of choice, but it is of lesser quality than Bluehost. There is no big difference between these web hosting plans with WordPress. Click here for more details on Hostgator…
- Godaddy:
GoDaddy is also a web hosting service similar to HostGator. Their most common difference is speed. HostGator is slightly faster than GoDaddy. View details on GoDaddy…
- Namecheap:
Namecheap is different from the other web hosting websites with WordPress in that it is the cheapest among those listed. There are other cheaper web hosting websites out there. But amongst these, Namecheap is the cheapest. I will create another article for the cheapest web hosting, together with its quality of service.
- SiteGround:
SiteGround is one of the top web hosting websites with WordPress online in terms of service quality, but it has a higher price than Bluehost. This makes Bluehost more preferable to many people than SiteGround.
-
How to get a free domain and web hosting.
There are many ways and companies to get a free domain and web hosting service. But I will be talking about one of them and the steps to create a free website.
I am not a fan of free websites because they have some limitations and unpleasant conditions for business. I don’t advise anyone to use this type of website for business. The limitations of the free websites in the professional world are not tolerable. These sites are mostly used for educational purposes and not for business for the following reasons:
- They are not stable: At times, these websites may load, but not all the features will appear, or the features may appear in a disordered manner. To resolve the problem, you will have to reload the website again till it appears normally.
- Weird domain: The free domains never end with popular attachments like the .com, .net, .org, etc. They always end with rare and long attachments, which people won’t find attractive or memorable.
- Distractions: Some of this free domain has features that cannot be removed or changed, like random redirections.
STEP 2: Build your Website With WordPress.
WordPress is a free software for anyone to download and install on any website. It is used to design any kind of website of choice with any restrictions.
-
How to install WordPress on your Website.
Here, I will talk about the various steps to install WordPress on your website and start designing your website. This is done after you have bought your website domain name and hosting.
Some reasons why many people like to install WordPress on their Websites are as follows;
- It is Free.
- It is Fast, Secure, and Optimised.
- It is a DIY for building any kind of Website.
- It can run on any kind of website.
- It is SEO-ready to make promotions easily.
Step 1: The steps to install WordPress on your website are as follows;
- You should download the WordPress package to your local computer from the WordPress.org website using this link: https://wordpress.org/download/.
- The file will be downloaded as a zip file, you will have to unzip the file. In the unzipped file, a folder named WordPress is saved in your local computer.
Step 2: The WordPress document has to be uploaded to your web hosting account.
The web hosting account is the account you will create when you purchase the domain name and hosting of your website. It is through this hosting account that software to create and manage your website is being installed. There are 3 ways of uploading WordPress. They are;
Upload by SSH – See How to Get and Use SSH Access for guidance.
Upload by File Manager – See How to Upload Using the File Manager for guidance.
Upload by FTP – See FTP Getting Started for more guidance.
Step 3: You will create a MySQL Database. This MySQL database is where the WordPress database is being stored. In your web hosting account, you will have to log in to your cPanel. In the database section, click on the MySQL Database Wizard icon.
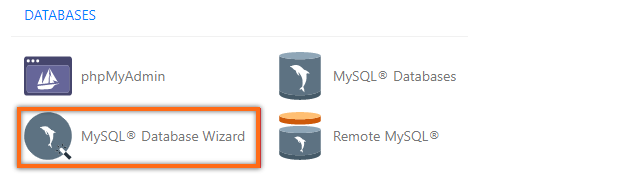
- After clicking the MySQL database wizard icon, you will also click on Create a Database User. Then you will enter your user name and password then click on create user.
- Here, you should add the user to the database, then click on the All Privileges checkbox, then click on Next.
- Next, you create the database name, user name, and password as we are going to use them on Configuring wp-config.php.
Step 4: Configuring wp-config.php is essential because this process controls the WordPress database by deciding from where data has to be pulled. So this process is the final setup and is obvious for the WordPress settings.
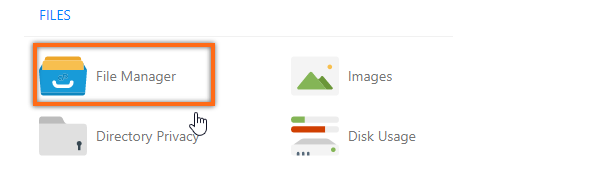
The wp-config-sample.php is found in a WordPress folder in File Manager. The folder name for this domain by default is public_html. The process to find the public_html is as follows;
- We log in to cPanel.
- Scroll to the Files section and click on File Manager
- On the left-hand side of the navigation menu, you should click on public_html to display the list of data.
- On the top right-hand corner of the File Manager table is a setting. Click on the settings button, and a pop-up list will appear.
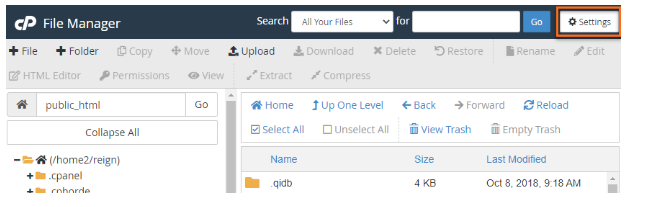
- Check for show hidden files(dotfiles), then click on the save button
- Now we come back to the left panel of File Manager and right-click on wp-config-sample.php and select We are changing it to wp-config.php.
- Right-click again on wp-config.php and click Edit on the second pop-up box that will appear.
- As the file opens, you will have to replace some of the words as shown below

- Replace the database name here with the name you created for the MySQL Database.
- Replace the username with the username you created for the MySQL Database.
- In the place of a password, replace it with that which you created for the MySQL Database.
One thing to know is, there should be no space after and before the Database name, username, and password. The amount of space should remain the same as you met it.
- When you are through with the editing, click the save changes
- Then close the settings and return to the File Manager.
Step 5: Then you can now run the Installation for WordPress on a new tab on your computer.
- When you run the installation script for the WordPress you downloaded on your local computer, you will be redirected to one of the following URLs:
![]()
OR

- You should replace the example.com in the URL above with the domain of your website and press Enter on your keyboard.
- In this next and last step, you will have to do a small setup for your WordPress.
Step 6: As WordPress opens, the first thing that appears is the language set-up for your WordPress.
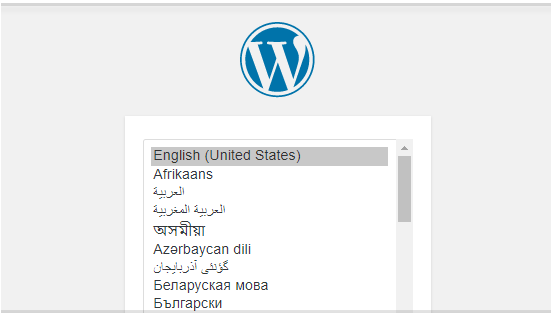
- You will choose the language that suits you, then click the continue button for the next setup.

- The next page is a welcome page with a small note. Below the note is some information needed section which needs to be answered.
- Site Title: This part is of no big importance as it can be changed by you anytime you want.
- Username: The actual username is always admin, but I advise you to change it to something else, for it is risky for any hacker to have access to it. Then your website will have no security.
- Password: On this part, a password is automatically generated for you, but you can still change it to your password if you wish.
- Your Email: Here, the Login information for your WordPress account will be sent to your Email address. So the Email address you enter should be an Email address you have access to.
- Search Engine Visibility: This part is very important in that if you want your website to be seen on the Google search engines, then leave this part unchecked. But if you do not want your website to be seen on Google, then check it.
When you are through, then you should click on the install WordPress button. You will later be taken to a Thank you page. From here, we are through with the setups. Now, we should try logging into WordPress using the information in the setup we just created.
Make sure not to forget your password and username, for it is vital at this point. You should write it somewhere so that it will not be forgotten.

4 Comments
Add a Comment
You must be logged in to post a comment.
I agree with your point. Every free plugin has an upgrade which is usually a paid version. The free options are still good but need some physical effort while the paid options have integrated software that does all the hard works for you.